Preference Cards
Preference cards determine the chart template, orders, discharge instructions, and supplies that are associated with a procedure. Depending on how the card is set up, it is also able to auto-fill certain parts of the chart, such a patient position and solutions. Preference cards are surgeon specific and as such, a separate preference card must be created and associated with each surgeon that performs a procedure.
Jump to:
Create or Edit a Preference Card
Create a Preference Card from Scratch
Create a Preference Card by Copying
Inactivate or Delete a Preference Card
Preference Card Structure
In HST Practice Management , preference cards are separated into three tabs:
• General Information
• Supply Items
• EHR Information
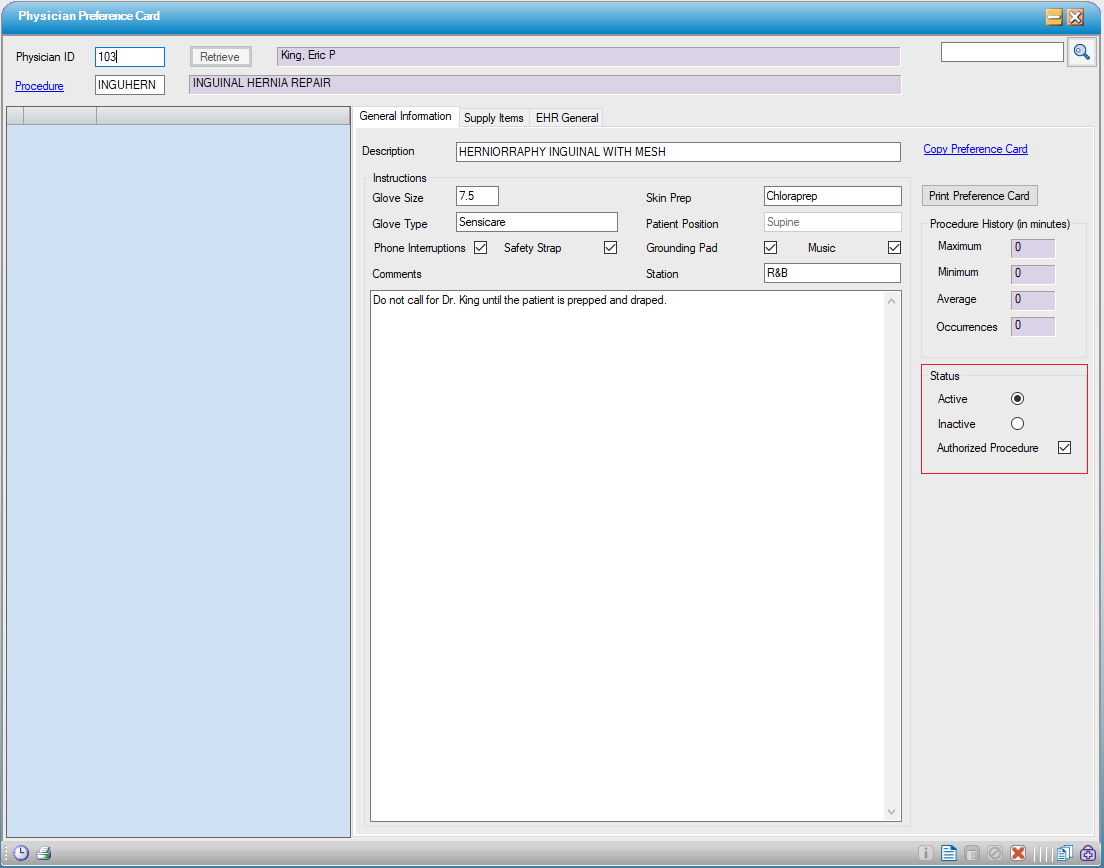
General Information Tab
This tab contains the procedure description, surgeon general preferences, and a section for comments. When a preference card is printed, this section appears at the top of the page.
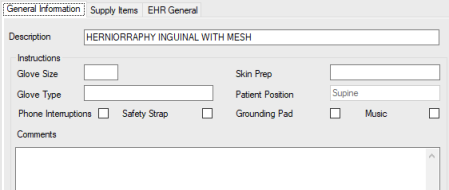
- The Description is free text and is worded according to the Center’s preference.
- Glove Size, Glove Type, and Skin Prep are free text. These are for information only and are not connected to the Supplies Used.
- Patient Position is pulled from the position selected in the EHR General tab.
- The comments section is for any additional information the Center wishes to include.
Supply Items Tab
This tab lists all the supplies and equipment associated with a procedure. It covers all areas of the Center – from pre-op to post-op. For a supply or equipment item to be included, it must be present in the Center’s Item Master in HST Practice Management.

For each supply item on the card, there is additional information that can be entered: Quantity, Location, Grouping, Area, BLOC, and Notes.
- Quantity – This is the quantity that will used for the case. Supply items with a quantity of 0 will still show in the Supplies Used BLOC for the workflow, making it easier for a user to find and charge for a supply that is not always used.
- Location – Location can be used to indicate to staff where to find a supply or piece of equipment. Locations are configured in Code Table Maintenance under Supply Location. For Location options to appear in the Preference Card Supply Items tab for a given supply item, that supply must have a location (or locations) added in the Item Master on the Locations tab. Keep in mind, location cannot be edited globally across all preference cards at once. Any edit to the location of a certain item must be changed in each individual preference card on which the item appears.
- Grouping – Groupings can be used to sort items in HST Practice Management when printing preference card reports. Tapping the Group hyperlink at the top of the grid will sort items by their area and group. Groupings do not need to be entered for items to flow correctly into HST eChart. Grouping options are set up in Code Table Maintenance/Physician Pref Card Group. Some examples of Preference Card Groupings are: Equipment, Instruments, Pre-Op Supplies, Operative Supplies, Post Op Supplies, General Supplies, Drapes/Packs, Implant, Medication, Pre-Op Medications, Suture, and Dressings.
- Area – Area determines into which HST eChart workflow's Supplies Used BLOC the supply will populate. Area options include: Anesthesia, Pre-Op, Intra-Op, PACU, Post-Op, 23-Hour Stay. Some other areas appear in the drop down also but are not typically used in conjunction with supplies: Registration and Discharge.
-
BLOC – Certain supply and equipment items will flow into select BLOCs.
- DrainsAndPacking: When DrainsAndPacking is selected, the item will auto-populate in the Drains/Packing Placement BLOC 029. The preference card quantity will not reflect in the Drain/Packing BLOC but will in the Supplies Used BLOC.
- Dressing: When Dressing is selected, the item will auto-populate in the Dressings BLOC 038. The item and preference card quantity will be reflected in the BLOC. Supply quantity will also be reflected in the Supplies Used BLOC.
- Drug: The Drug selection has no current function in HST eChart. Drugs are populated into HST eChart through order sets. This BLOC selection should not be used at this time.
- Implants: When Implants is selected, the item will auto-populate in the Implants BLOC 031. The item and preference card quantity will be reflected in the BLOC. Any Notes entered for the item in the preference card will display in the BLOC as well. Supply quantity will also be reflected in the Supplies Used BLOC.
- Prep: When Prep is selected, the item will auto-populate in the Prep BLOC 025. The item and preference card quantity will be reflected in the BLOC. Supply quantity will also be reflected in the Supplies Used BLOC.
- Solution: When Solution is selected, the item will auto-populate in the Solutions BLOC 037. The item and preference card quantity will be reflected in the BLOC. If the item has a route associated with it in Item Master under the Medication tab, that will also display. Supply quantity will also be reflected in the Supplies Used BLOC.
- Notes: Free text notes can be added to any item. The note will print on the preference card and will show in the Supplies Used BLOC.
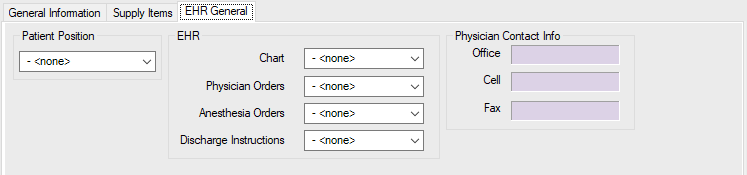
EHR General Tab
The EHR General Tab is where the patient position, chart template, order sets, discharge instructions and Operative Report Template (if applicable) are selected.
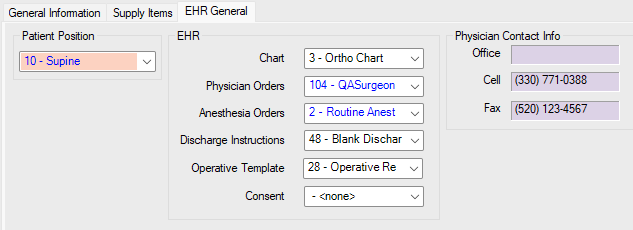
- Patient Position options are configured in Code Table Maintenance under Position. The position selected will be reflected in the General Information Tab of the preference card as well as in HST eChart in Positioning BLOC 026.
- Chart selects the Chart Template that will be used in HST eChart. Chart Templates are configured in HST eChart in Admin Home>Charts.
- Physician Orders selects the physician order set that will appear in Physician Orders BLOC 128. Physician orders are configured in HST eChart Admin Home>Orders Designer.
- Anesthesia Orders selects the anesthesia order set that will appear in Anesthesia Orders BLOC 129. Anesthesia orders are configured in HST eChart in Admin Home>Orders Designer.
- Discharge Instructions selects the Discharge Instruction Set that will appear in Discharge Instructions BLOC 125. Discharge Instruction Sets are configured in HST eChart in Admin Home>Discharge Instructions and Discharge Instruction Sets.
- Consent has no current function in HST eChart.
- Physician Contact Info is read only information that populates directly from the Physician Profile.
Create or Edit a Preference Card
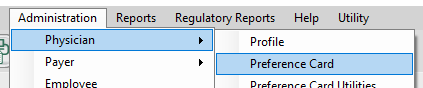
Preference cards are created and edited in HST Practice Management under Administration, Physician. Preference cards can be created entirely from scratch or by copying an existing preference card. They can be edited on an individual basis, or as groups using the Preference Card Utilities.
This section will cover:
• Create a Preference Card from Scratch
• Create a Preference Card by Copying
• Editing a Preference Card
Create a Preference Card from Scratch
In the Preference Card window in HST Practice Management, select the “new” button at the bottom right side of the window to create a new preference card.
Complete each preference card tab as desired. See Preference Card Structure for detailed information about each tab.
General Information Tab
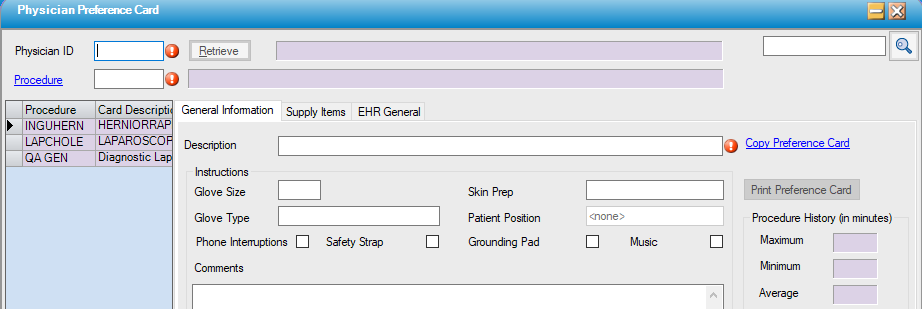
- Enter the Physician ID by typing it in the text box. If not known, a physician’s Physician ID number can be located in HST Practice Management under Administration>Physician>Profile. The user can also search for a physician by name using the search field in the top right corner.
- The procedure can be entered by typing it in the text box, or by searching for it. The search function can be produced by tapping the Procedure hyperlink.
- Type the desired Description for the preference card.
- Additional information, such as glove size and notes may be entered in this tab.
Supply Items Tab
To add a supply item in an empty row:
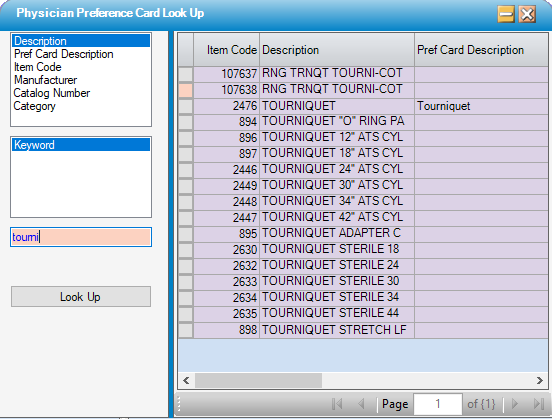
- In the Item Code cell either type in the Item Code or tap the magnifying glass to search for an item. Tapping the magnifying glass opens a window where the item can be searched for by various terms. When the desired item is found in the search box, tap the grey square on the left side of the grid to add it to the preference card.
- Once an item is added to the preference card, Quantity, Location, Grouping, Area, BLOC, and Notes can be added as desired.
- Repeat this process for all supplies and equipment.


To delete a supply item:
- Tap on the grey square to the left of the line item which will highlight the row in the preference card.
- Press delete on the keyboard.
EHR General Tab
Select the desired option from the drop-down menus. If a newly created chart template, order set, or instruction set is not displaying in the drop-down menu, right tap on the menu and select “refresh.”
The preference card may be saved once complete, or at any time during the process, by hitting the save icon at the bottom left of the preference card window.
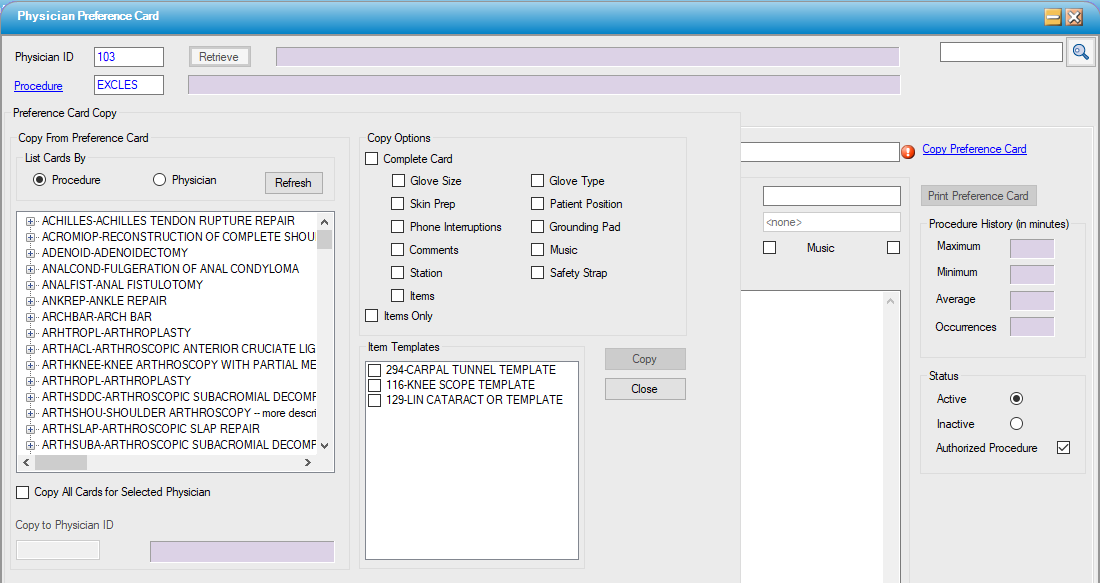
Create a Preference Card by Copying
A new preference card can be created by copying an existing card for a different surgeon and/or procedure. The entire card, including general information and EHR selections, can be copied or just the supply items can be copied.
If copying an entire preference card, only the Physician ID and Procedure must be entered– the other information will be copied from the other preference card. After copying, any information or items can be edited as desired.
-
Select the “new” button at the bottom right side of the Physician Preference Card window.
- Enter the Physician ID by typing it in the Physician ID field. If not known, a physician’s Physician ID number can be located in HST Practice Management under Administration>Physician>Profile.
- Enter the Procedure in the Procedure field. The procedure can be entered by typing it in the text box, or by searching for it. The search function can be accessed by tapping the Procedure hyperlink
- If only copying items, type the desired Description for the preference card.
- If only copying items, enter additional information, such as glove size and notes, as desired.
- Tap the "Copy Preference Card" hyperlink to the right of the preference card description to display copy options.
- Available preference cards for copying can be sorted by Procedure or Physician by checking the appropriate radio button and tapping refresh.
- If sorting by procedure, tapping the plus to the left of the procedure will display each physician that has a corresponding card.
- If sorting by physician, tapping the plus to the left of the physician’s name will display all preference cards for that physician.
- Select a card to copy by single tapping on it.
- In the Copy Options section, check either Complete Card or Items Only. If copying the complete card, subsections can be unchecked so that only the desired components are copied.
- Hit the Copy button to copy the selected components to the new card.
- Edits or additions may now be made under the Supply Item and EHR General tabs.
- The preference card may be saved once complete, or at any time during the process, by hitting the save icon at the bottom left of the preference card window.

Editing a Preference Card
Any item or selection in a preference card may be edited except for the Physician ID and Procedure. Edits can be applied to individual cards by opening the card and entering changes or to groups of cards by using the Preference Card Utilities. If using the group edit, only supply items may be edited, not the General Information or EHR Information tabs. Any changes made will be reflected in charts opened after the edit was saved.
Editing Single Preference Cards
To edit a single preference card:
- Open the preference card in HST Practice Management
- Make any desired changes. Changes can be made to any part of the preference card except Physician ID and Procedure.
- Tap save.
Editing Groups of Preference Cards
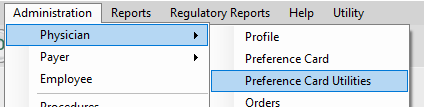
Groups of preference cards can be edited using the Preference Card Utilities function in HST Practice Management under Administration>Physician>Preference Card Utilities.
The Utilities function can be applied to all preference cards, all a physician’s preference cards, all preference cards for a procedure, or any combination of cards.
The Utilities function can only: add an item, delete an item, or replace an item.
To Add an Item:
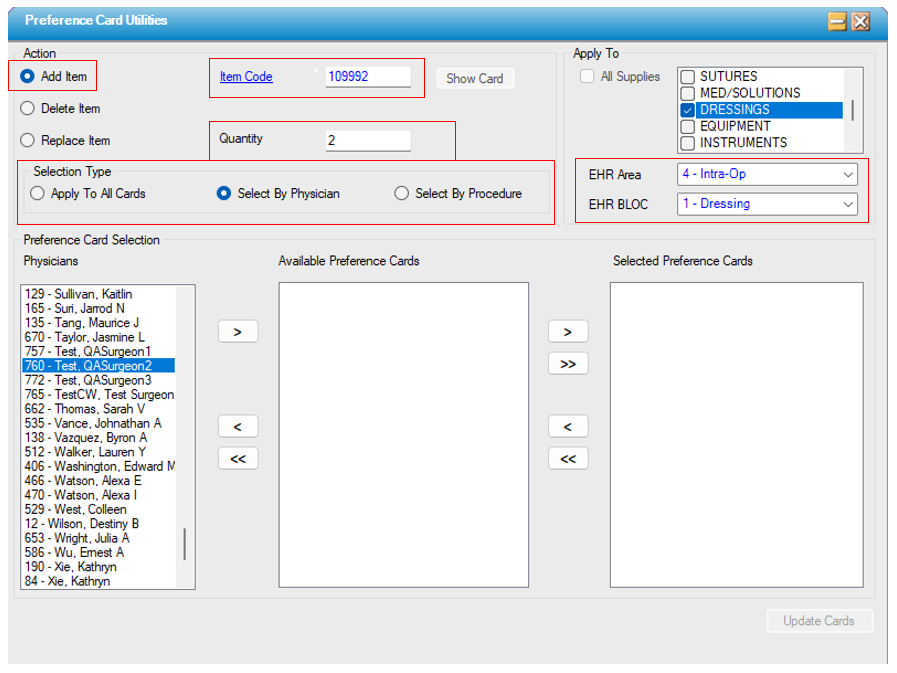
- Select the Add Item radio button
- Enter the Item Code for the item to be added.
- Enter the quantity to be added.
- Select the preference cards to which to add the item.
- If adding the item to all cards, select the Apply to All Cards radio button for Selection Type and then tap Update Cards.
- If adding the item to only certain cards, select either the Select By Physician or Select By Procedures radio buttons for Selection Type.
- If selecting by physician, all physicians will be listed in the far-left Physicians column.
- Select the physician whose card(s) are to be edited by double tapping the physician name or by highlighting the physician name and hitting the single right arrow to the right of the Physicians column.
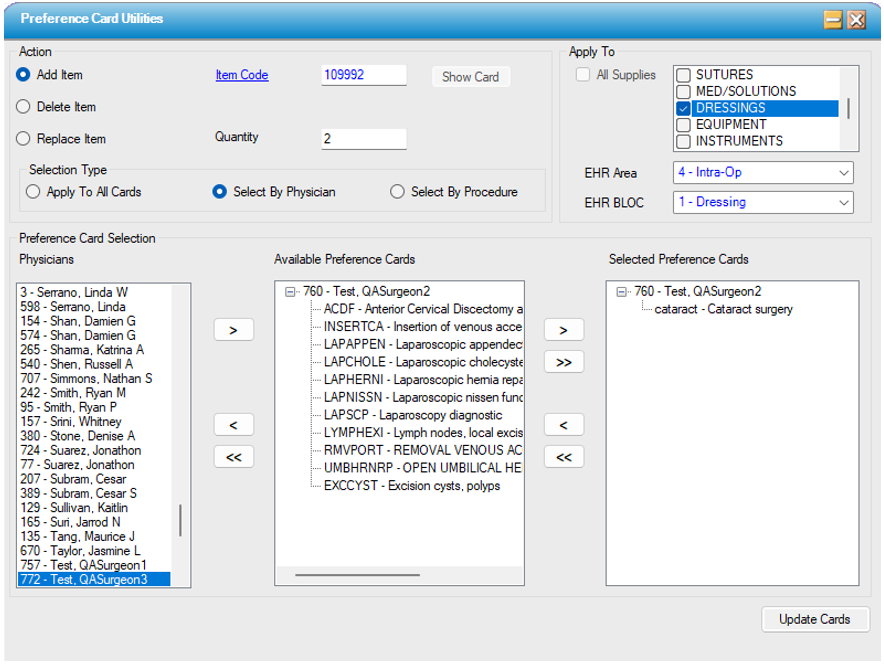
- The physician will now be in the middle Available Preference Cards column.
- Tap the small + to the left of the physician’s name to expand the view and see all their available preference cards.
- Double tapping or highlighting the physician name and using the single right arrow will move the physician and all their cards to the Selected Preference Cards column. Double tapping or highlighting the procedure and using the right arrow will move just that preference card to the Selected Preference Cards column (though it will still be listed under the physician’s name). The same actions can be used to move cards from the Selected Preference Cards column back to the Available Preference Cards Column.
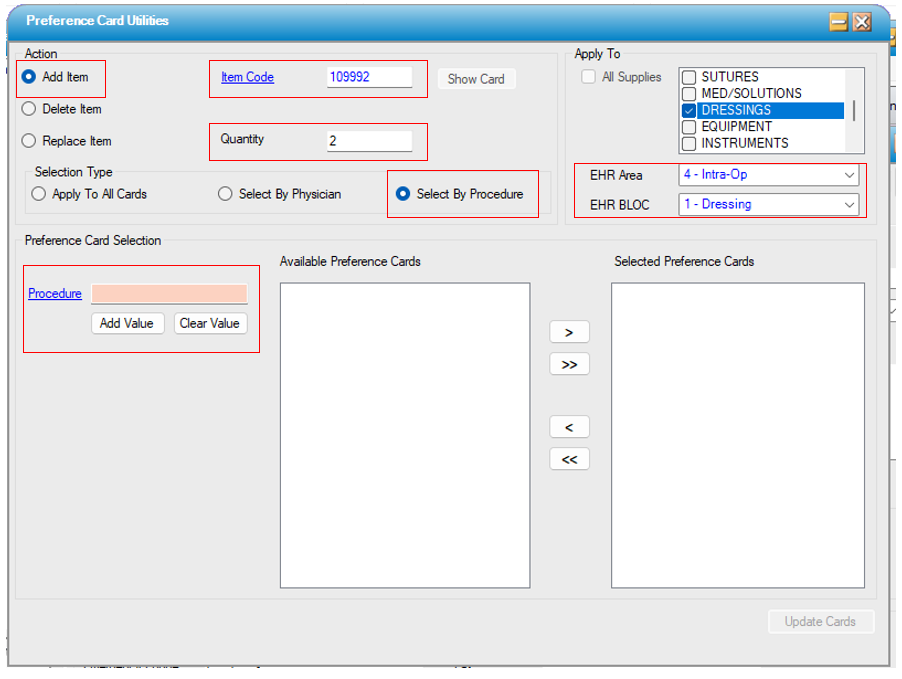
- If selecting by Procedure, the process is similar to selecting by physician. The major difference is that instead of all available procedures being listed in the far-left column, the procedure is typed in or found using the hyperlink search function.
- Type in or search for the desired procedure and tap the Add Value button.
- The procedure will appear in the middle column.
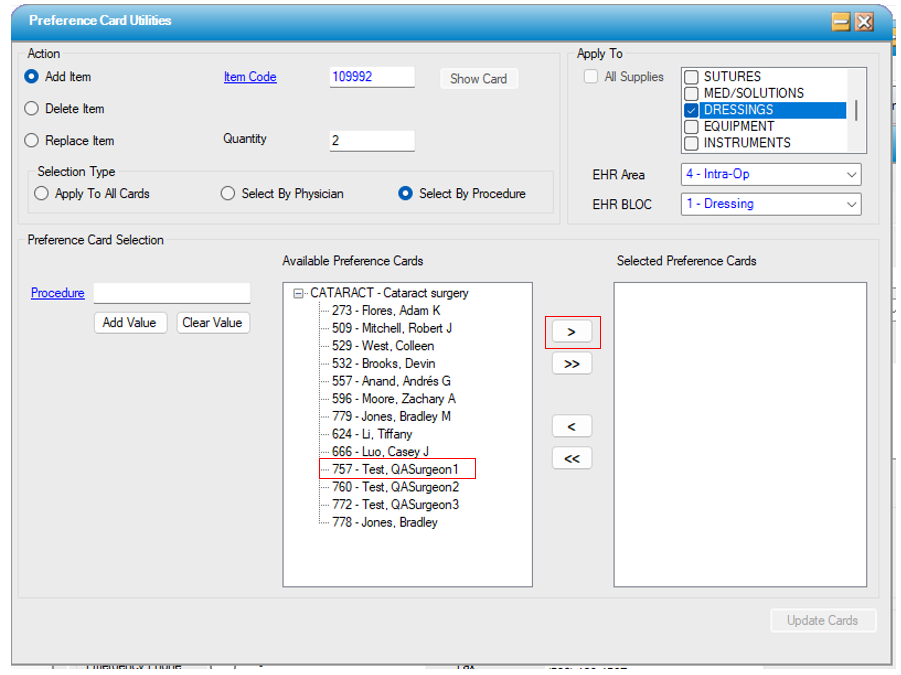
- Tap the small + to the left of the procedure to show all physicians with a card for that procedure.
- Double tap or highlight the physician and tap the right arrow to move the physician to the Selected Preference Cards column.

To Delete an Item:
- Select the Delete Item radio button.
- Enter the Item Code in the text box.
- Tap Show Card to view all the preference cards that contain the item.
- Check the box to the left of the preference card(s) from the item needs to be deleted, then tap Update Cards.

To Replace an Item:
- Select the Replace Item radio button.
- In the Old Item Code text box enter the item code for the item that is to be replaced.
- In the New Item Code text box enter the item code for the item that is replacing the old one.
- In the Quantity text box, enter the desired quantity for the new item.
- Tap Show Card to view all the preference cards that contain the item to be replaced.
- Check the box to the left of the preference card(s) on which the items are to be replaced.
- Tap Update Cards.

Inactivate or Delete a Preference Card
Inactivating a preference card will keep the card information in HST Practice Management, but the card will no longer appear when scheduling that procedure. If scheduling a case with an inactivated preference card, a note will display in the Credential Comments that states, “No Preference Card.” Deleting a preference card will permanently remove the card and its data from HST Practice Management.
To Inactivate a Preference Card:
- Navigate to the Physician Preference Card in HST Practice Management.
- Select the Inactive radio button in the Status section on the right side of the Physician Preference Card window.
- Tap the save button.
To Reactive an Inactive Card:
- Navigate to the Physician Preference Card in HST Practice Management.
- Select the Active button in the Status section of the Physician Preference Card.
- Tap the save button.
To delete a preference card:
- Navigate to the preference card to be deleted.
- Tap the delete button
 at the bottom right of the preference card window.
 - A warning window will pop up to confirm the deletion.
- Tap Yes to permanently delete the card.
Print a Preference Card
Preference cards can be printed either directly from the preference card window or through the Reports function in HST Practice Management. The Reports function allows the user to print multiple preference cards at once. There are multiple ways to filter and select the preference cards to be printed, depending on which report is run.
Print from a Preference Card:
To print a preference card from directly from the card, open the desired card and tap the Print Preference Card button on the right side of the General Information tab.
Print from Reports:
Preference cards can be printed through two EHR Reports: E63000 Physician Preference Cards – by DOS and E63013 Physician Preference Cards. Report E63000 prints preference cards for scheduled cases. Report E63013 prints preference cards based on the selected filters. Both reports offer multiple ways to filter and customize the resulting report.
E63000 Physician Preference Cards – by DOS
This report prints a preference card for each posted case for the date range entered in the From Date of Service and To Date of Service fields. A separate card is printed for each scheduled case.
To view and print the report enter the date range desired, select any desire filters, and tap the View Report button. Only a date range is required to create the report. The other filter fields, which are discussed in detail below, are optional. The filters only apply to the cases in the selected date range. The default report organizes cards by room and then by the cases’ scheduled date/time.
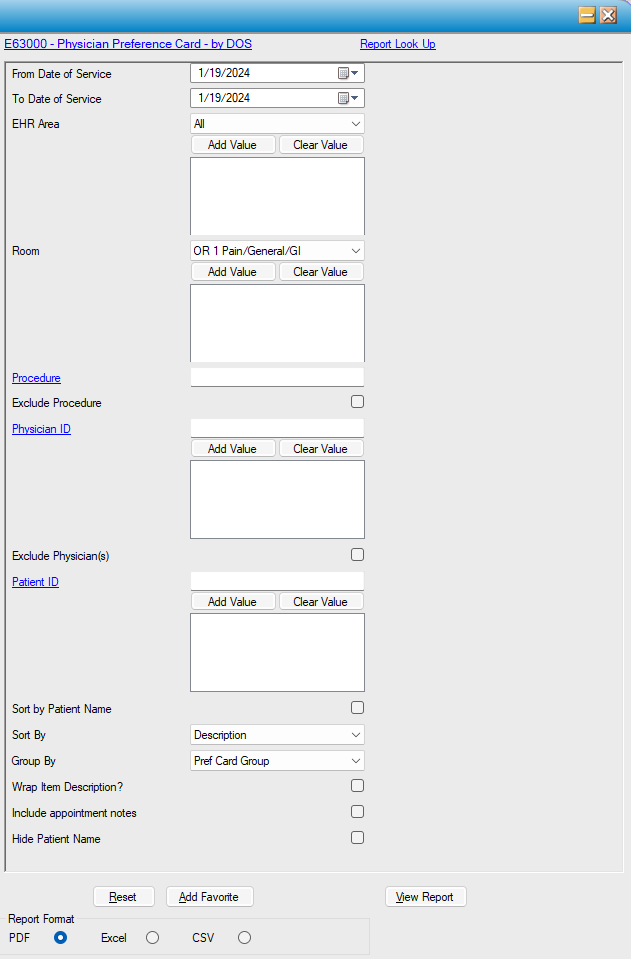
The From Date of Service and To Date of Service: Defines the date range from which the report will pull.
EHR Area: The drop-down displays all workflow areas. Selecting an area and tapping Add Value will result in the printed preference cards only including the supplies for that area. This function is dependent on the preference cards having Areas selected for the individual items.
Room: Selecting the desired Room(s) and tapping Add Value will result in the printing only the preference cards for the selected room(s).
Procedure: Entering a procedure in the text box will result in a report that includes only the preference cards for that procedure. Entering a procedure and checking the “Exclude Procedure” box will result in a report that includes preference cards for all scheduled procedures except the entered procedure.
Physician ID: Entering a physician and tapping Add Value will result in a report that includes a preference card for each scheduled for the selected physician. Entering a physician and checking the Exclude box, will result in a report that includes all preference cards except the selected physicians. More than one physician may be entered for inclusion or exclusion.
Patient ID: Entering a patient’s ID and tapping Add Value will result in a report that includes preference cards for only selected patient(s). More than one Patient ID may be used to filter the report.
Sort by Patient Name: Checking Sort by Patient Name will result in the report in which the preference cards are organized alphabetically based on the patients’ last names.
Sort By: Preference cards automatically group items based on EHR area. The Sort By option determines how the items in each group are sorted. Items can be sorted by: Description, Catalog Number, or Item Location.
Group By: Preference cards automatically group by Pref Card Group, but user may also elect to group items by Item Category, Item Location, or no grouping.
Wrap Item Description?: Selecting this box will allow extra long item descriptions to wrap to the next line instead of truncating the description to fit on one line.
Include appointment notes: Selecting this box will include any Appointment Notes in the print, displaying them just under the Procedure.
Hide Patient Name: Checking this box will print all selected cards for the chosen date range leaving the Patient Name field blank.
*Note: User can elect to save the report as a favorite after the desired parameters are selected. This report can be viewed or printed as a pdf document or saved in Excel or CSV format.
E63013 - Physician Preference Card
Report E63013 prints all preference cards. Various filters can be applied to parse the report.
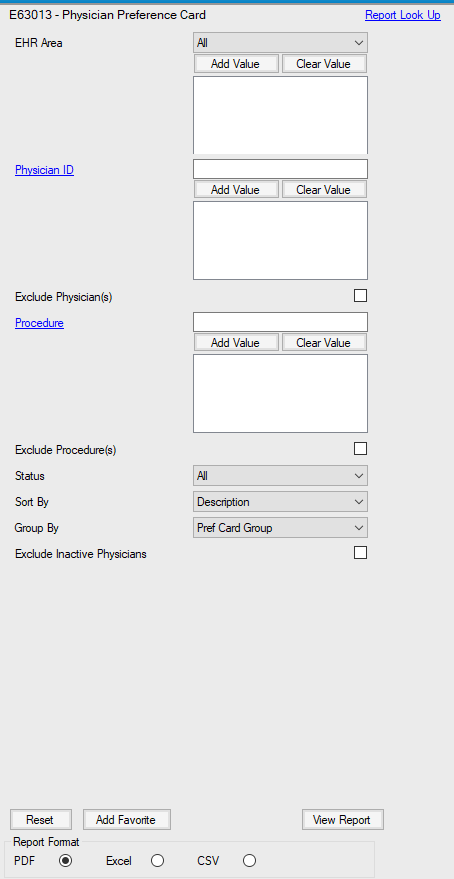
EHR Area: The drop-down displays all workflow areas. Selecting an area and tapping Add Value will result in the printed preference cards only listing the supplies for that area. If a card did not have any supplies for the area, it would not be included in the report. This function is dependent on the preference cards having Areas selected for the individual items.
Physician ID: Entering a physician and tapping Add Value will result in a report that includes all of the physician's preference cards. Entering a physician and checking the Exclude box, will result in a report that includes all preference cards except the selected physicians. More than one physician may be entered for inclusion or exclusion.
Procedure: Entering a procedure in the text box will result in a report that includes only the preference cards for that procedure. Entering a procedure and checking the “Exclude Procedure” box will result in a report that contains all preference cards except the entered procedure.
Status: The status drop-down selection will limit the report to include only the preference cards that have the selected status. Choices are All, Active, or Inactive.
Sort By: Preference cards automatically group items based on EHR area. The Sort By option determines how the items in each group are sorted. Items can be sorted by: Description or Catalog Number.
Group By: Preference cards automatically group items based on EHR area. This Group By option will further group the items in each area. Items can also be grouped by: Preference Card Group, Item Category, or Item Location. This function is dependent on the preference cards having a Group and/or Location selected for the individual items.
Exclude Inactive Physicians: Checking the Exclude Inactive Physicians box excludes from the report all preference cards associated with inactive physicians.
*Note: User can elect to save the report as a favorite after the desired parameters are selected. This report can be viewed or printed as a pdf document or saved in Excel or CSV format.
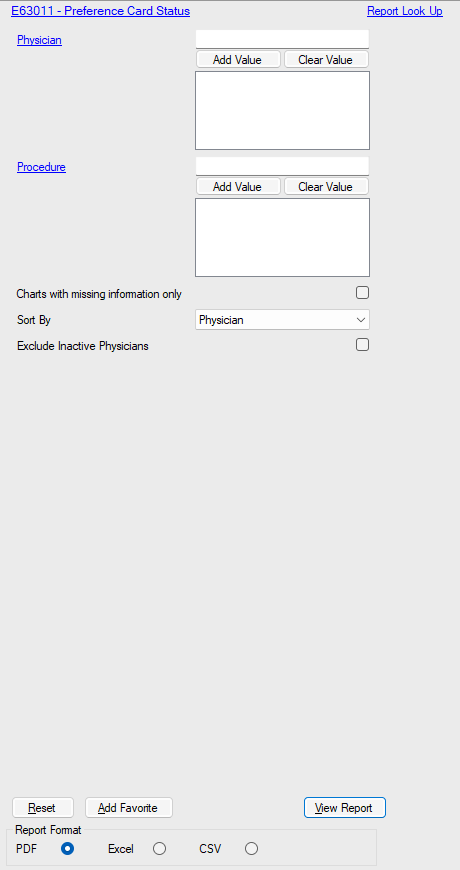
E63011 – Preference Card Status
This report can be used to see if certain elections on the EHR General tab are missing for any preference cards. The default prints all preference cards and shows if there have been selections for Chart, Physician Orders, Anesthesia Orders, and Discharge Instructions for each card. It can be filtered to print only cards for certain physicians or to print cards for only certain procedures. The user can elect to only print the cards which are missing one of the above listed entries. This report can be sorted by Physician, Procedure, or Status and the user can elect to exclude any inactive physicians.
*Note: User can elect to save the report as a favorite after the desired parameters are selected. This report can be viewed or printed as a pdf document or saved in Excel or CSV format.
Other Reports
There are several other reports that are related to preference cards and are primarily used by Materials Managers:
CT6014 – Preference Card List
IV4003 – Physician Preference Card – By DOS
IV4017 – Physician Preference Card – Cost
IV4021 – Physician Preference Card
For help with the four reports above, please see the associated HST Practice Management Help File.