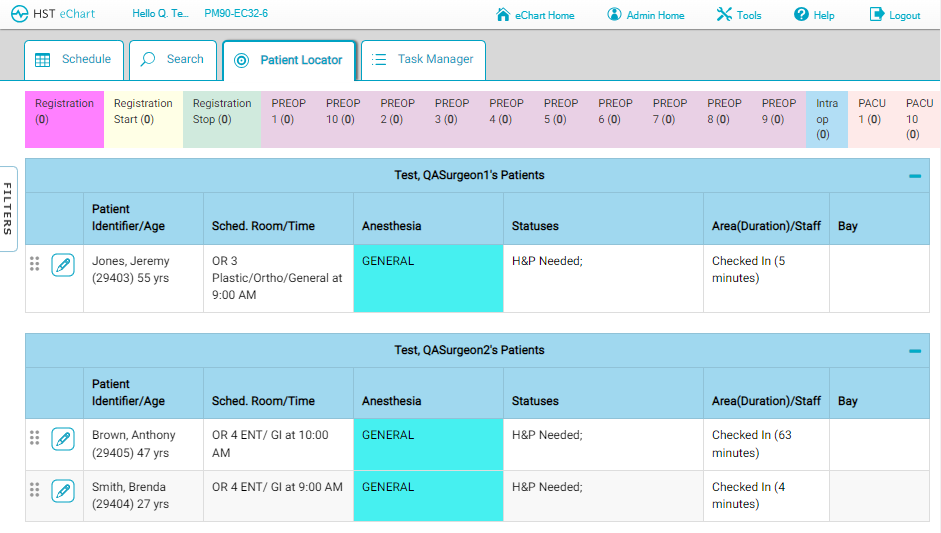
Patient Locator Tab
The Patient Locator tab, also known as the clinical patient locator, is used by staff to keep track of patients and their status across the Center.
The clinical locator displays a list of patients that have been seen in the center that day, sorted by primary physician. For each patient, their scheduled room and time, anesthesia type, status, area, and bay will display. The top of the locator displays the total patients in each area. The locator automatically updates - the user doesn't need to refresh the browser.
The patients are grouped by primary physician, and by default they display in the order they appear on the schedule. The user can rearrange the order by using drag and drop. Tap and hold the six grey dots next to the Edit icon and drag and drop the patient to the desired location. Reordering does not live edit the locator. Other users currently viewing the Patient Locator will need to refresh the browser to see the new order.
A user must have Patient Locator permission to view the Patient Locator tab.
Users can elect to view the patients on the Clinical Patient Locator using a number of different identifiers. Please refer to help topic Patient Locator Configurations for more information.
Jump to:
Updating
The clinical patient locator updates using data from multiple sources.
- Patient ID/Age - Comes from HST Practice Management and the Patient Information BLOCs
- Sched. Room/Time - Comes from HST Practice Management
- Status - Statuses are pulled from multiple BLOCs.
- Canceled - This status is created by a completed Cancel Case BLOC.
- H&P Needed - This status is created by an incomplete H&P Attestation BLOC. When the BLOC is completed, the status will disappear.
- Transferred - This status is created by a completed Patient Transfer BLOC.
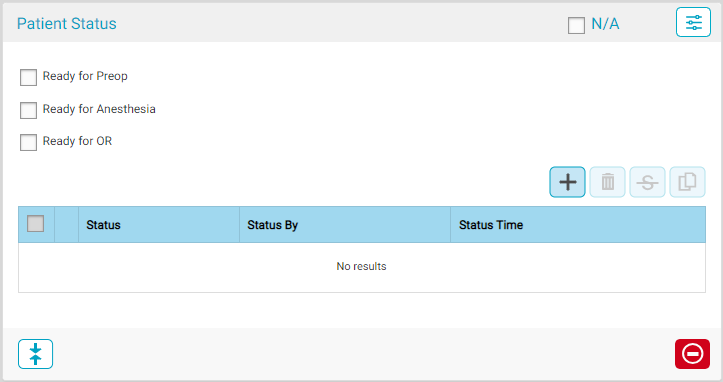
- “Ready” Checkboxes + Any Custom Status - These statuses are set using the Patient Status BLOC. The BLOC is Module or BLOC scoped. Each workflow will see a blank version of this BLOC. Users in the new area can apply a new status using the Patient Status BLOC in their workflow.
- Ready for Preop: this status can be set by checking the associated box in the Patient Status BLOC. This status will disappear when the Room In BLOC is completed in the Pre-Op Workflow.
- Ready for Anesthesia: this status can be set by checking the associated box in the Patient Status BLOC. This status will disappear when the Anesthesia Start Time BLOC is completed or the Room In BLOC is completed in the Intra-Op Workflow.
- Ready for OR: this status can be set by checking the associated box in the Patient Status BLOC. This status will disappear when the Room In BLOC is completed in the Intra-Op Workflow.
- Area(Duration)/Staff - Comes from the location selected in the most recently completed Room In BLOC.
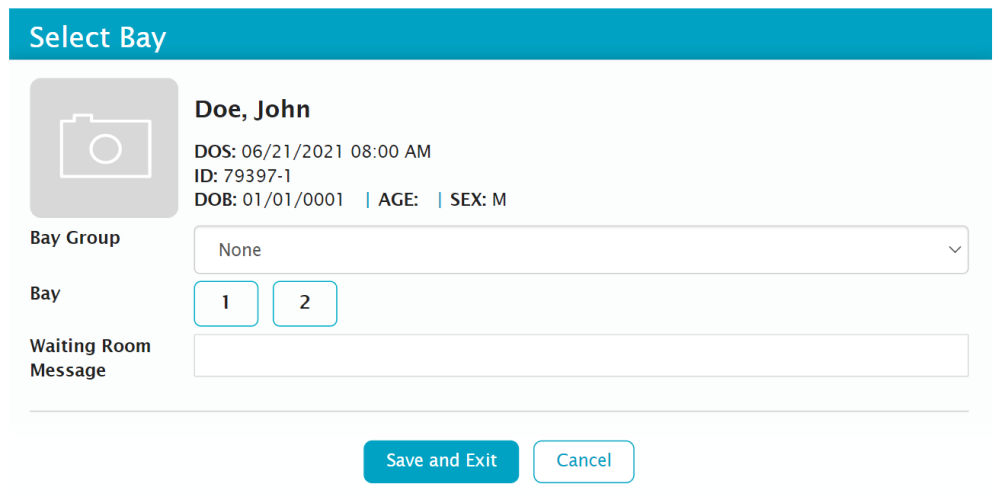
- Bay - Is entered from the Patient Locator screen by tapping the edit button for the patient. Select the Bay Group from the drop-down and then select the bay. The Bay status clears any time a patient moves to a new area/a new Room In is documented.
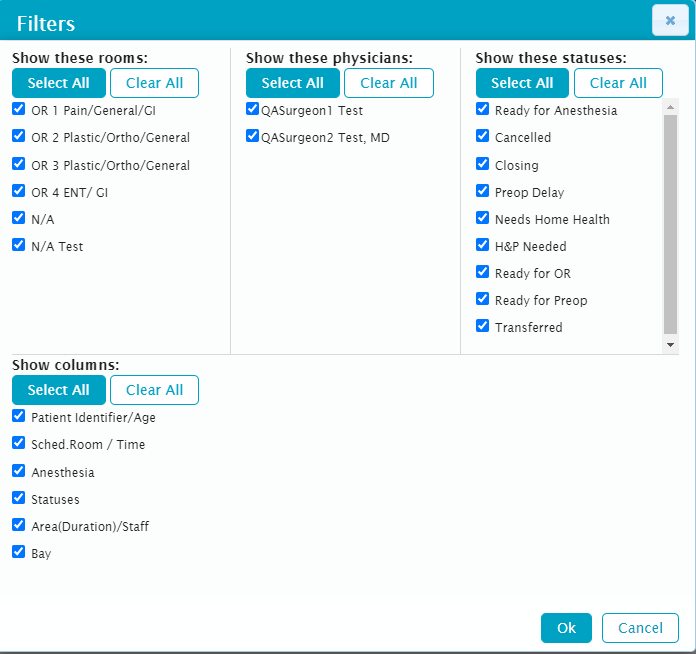
Filters
The Clinical Patient Locator can be filtered in much the same way as the schedule. Tap "FILTERS" on the left side of the screen to open the Filters flyout. The locator filters can be set to show only certain rooms, certain physicians' cases, or certain statuses. The user can also elect to hide some columns if the do not want to see them on the locator.
Configure
The clinical Patient Locator is configured in Admin Home. The configurations for the clinical and public locators are both located under Patient Locator. A user must have EHR Admin - Center Configuration and EHR Admin - Patient Locator permissions to be able to access the configurations.
The clinical locator configurations are located in four tabs: Bay Group and Bays, Patient Status, Announcements, and Patient Display.
Please see the Help Topic Patient Locator Configurations in Admin Home for more information.