Questionnaires and Questions
In HST eChart, a questionnaire is a group of questions or statements that can be inserted in a chart via one of the Questions BLOCs or the Consent BLOC. Questionnaires and questions/statements are created and configured in the Questionnaires and Questions section of Admin Home. The Questionnaires and Questions tile contains 2 tabs - Questionnaire Library and the Question/Statement Library.
Jump to:
Question/Statement Library
Questionnaire Library
Format Rows in a Questionnaire
Edit the Question/Statement Library from the Questionnaire Library
Add a sub-question to a question which has existing sub-question(s)
Question/Statement Library
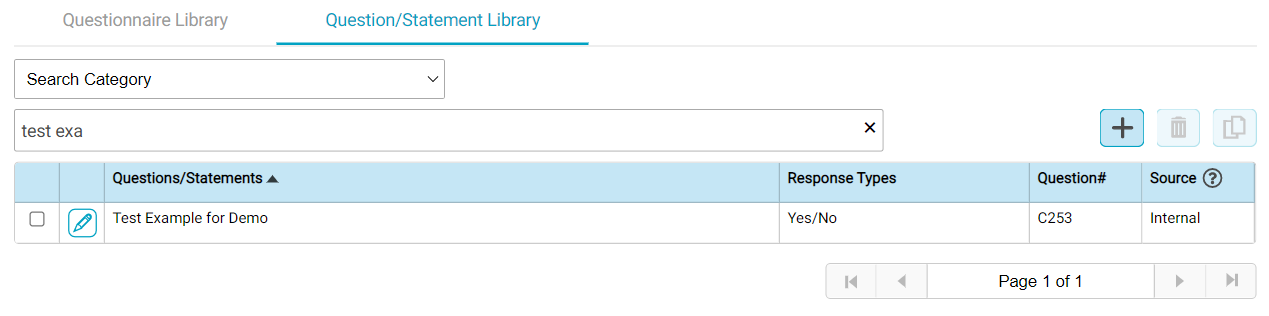
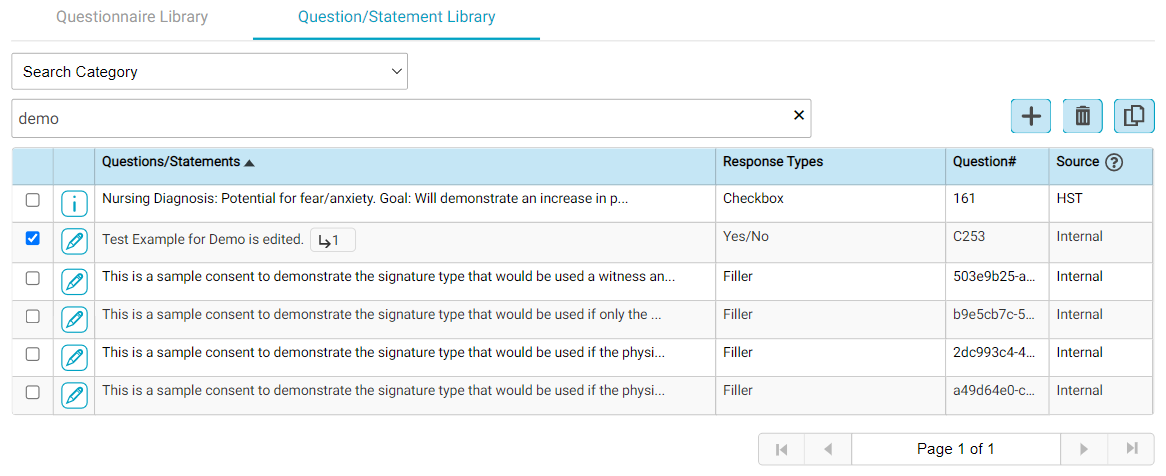
The Question/Statement Library tab contains a grid that lists all the questions or statements that can be used by the Center in a questionnaire. From the Question/Statement library tab, users can add, edit, or delete a question or statement.
At the top of the tab there is a Search Category drop-down menu. If a user selects a category from the drop-down, the question/statement grid will filter to only display questions which have that category assigned to them. To learn how to apply a category to a question, jump to Question Configurations.
Beneath the Search Category drop-down is the free text search field. The search field searches the question/statement text, sub-question text if any sub-questions exist, as well as Question #. As the user enters text in the search field, the grid below will update to reflect matching results. If the text matching the search term is located in a sub-question, the sub-question icon, ![]() , will be outlined in yellow.
, will be outlined in yellow.
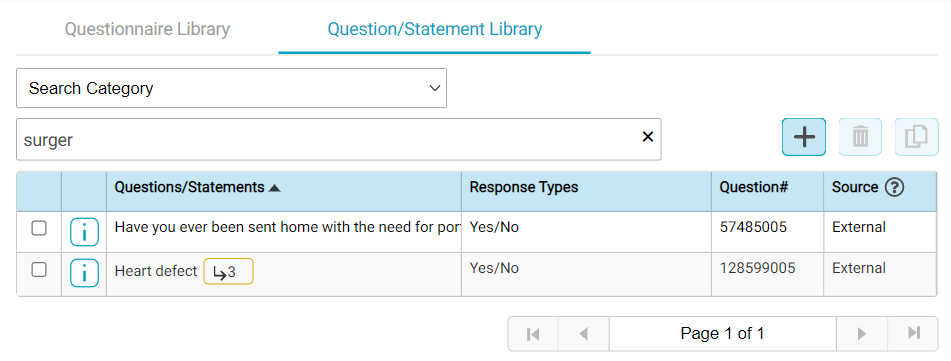
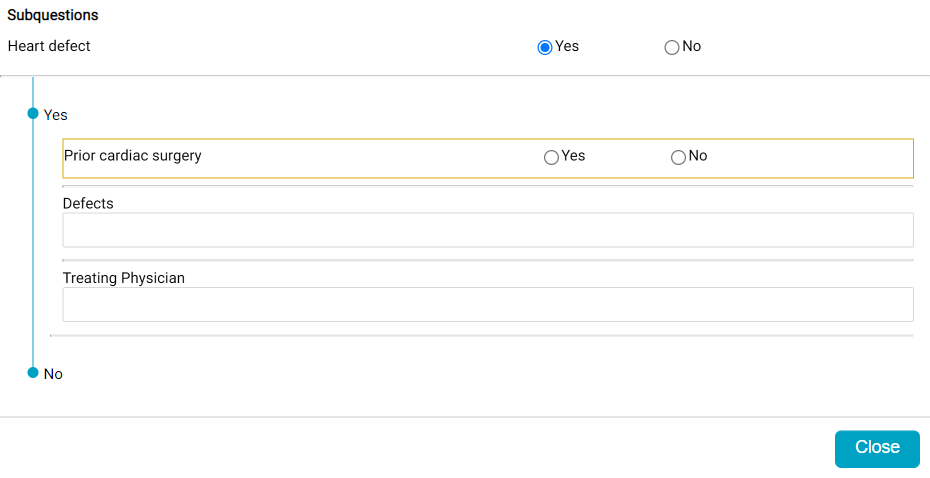
Note that in the above image, the sub-question icon for the second grid row is outlined in yellow. This is because the text matching the searched text "surger" is located within a sub-question. If the user clicks on the sub-question icon a flyout will appear displaying all the sub-questions. The sub-question which contains the searched term is outlined in yellow.
The Question/Statement Library grid contains columns for Questions/Statements, Response Type, Question#, and Source.
- The Questions/Statements column displays the text of the question. If the question has a sub-question, which is an additional question that appears if a particular response is selected for the question, the sub-question icon will display along with the question text.

- The Response Type columns lists the question's response type. Jump to Response Types to learn more.
- Question# is the ID number assigned to the question. Every question has a unique ID number.
-
The Source column reflects where the question originated.
- eChart is installed with a base set of questions. Those questions' source are listed as "HST."
- Centers that utilize an outside patient portal may have questions added to their library which are mapped to that outside portal. Those questions' source are listed as "External."
- All questions that a center creates will have the source listed as "Internal."
- If the center is using the HST eChart/HST Patient Engagement Integration, and questions imported from HST Patient Engagement are listed with a source of “PE”.
Response Types
Every question or statement must have a response type. The response type controls what type or format of response the user will see for the question when it is in a chart. eChart offers 19 different response types to choose from.
- Yes/No, Yes/NA, Yes/No/NA, Yes/No/Unknown, Positive/Negative, and Right/Left/Bilateral: All provide radio buttons for the response.

- Checkbox: Provides a checkbox for the response.

- Date: Provides a date entry field and calendar button for the response.

- Time: Provides a time entry field and a clock button for the response.

- Date and Time: Provides a date and time entry field for the response.

- Text: Provides a free text field for the response.

- Integer: Provides a numerical entry field for the response. The response must be a whole number. The plus and minus buttons adjust the entered value up or down by one.

- Decimal: Provides a numerical entry field for the response. The response can be a whole number or decimal. The plus and minus buttons adjust the entered value up or down by one.

- Filler: There is no field for a response. Only the text displays.

- Rhetorical: There is no field for a response. The statement text displays and eChart will insert the appropriate data for the Rhetorical place holder(s). For additional details, jump to Rhetoricals.

- Calendar: Provides a date entry field and calendar button for the response.

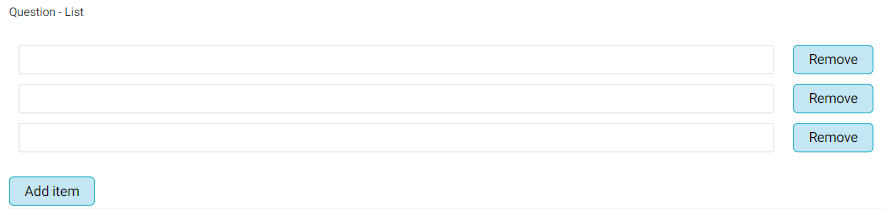
- List: Provides short, individual text fields for responses. The number of fields which appear by default is selected when the question is created, but the user can add or remove fields in the chart.
- Dropdown: Provides a drop-down field for selection. The options in the drop-down are created by the center.

- LongText: Provides a multi-line free text field for the response.

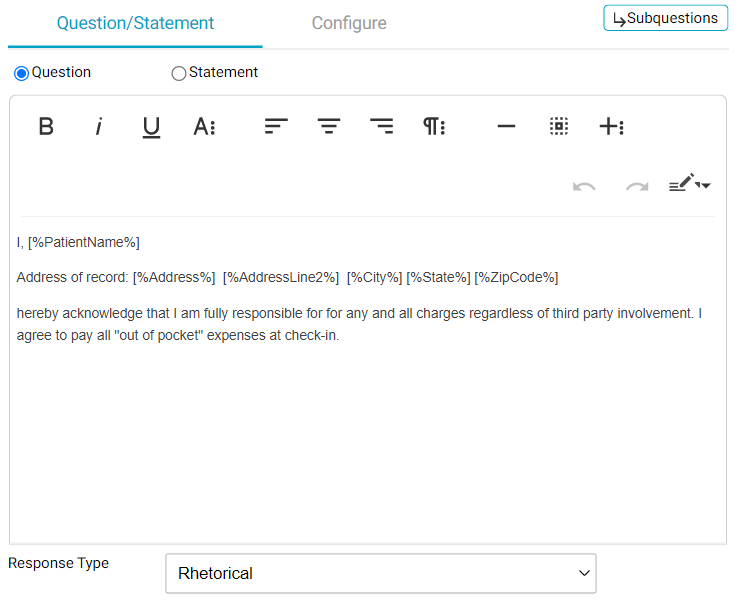
Rhetoricals
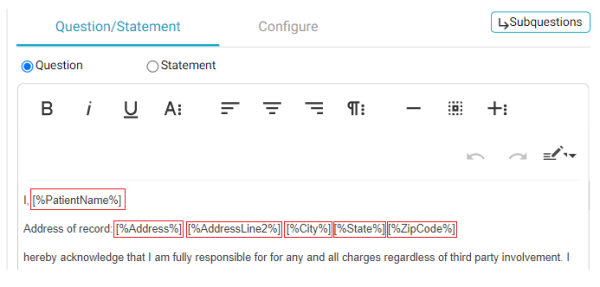
Questions/Statements with the Rhetorical response type are used to insert patient or procedure specific data, such as the patient's date of birth, into a Questions or Consent BLOC. These statements utilize data specific rhetorical placeholders, to indicate what piece of data is to be inserted and where it should appear. Multiple types of rhetorical data may be inserted into a single rhetorical statement. Each data type has its own rhetorical placeholder, which allows the user to easily view what data will appear where in the statement. In the following image, each rhetorical placeholder is outlined in red. To learn how to create a statement with the rhetorical response type, jump here.
Rhetorical data options:
|
Additional Diagnosis |
Except Primary Procedures | Primary Sub EPM/Phone |
| Address | Gender Identity |
Referring Physician |
| Address Line 2 | Implant(s) |
Responsible Party Occupation |
|
Age |
Main Phone |
Responsible Party Phone |
| ALL Procedures | Non-primary Provider(s) | Responsible Party SSN |
| Allergies | Occupation | Secondary Insurance Authorization # |
| Anesthesia |
Patient Name |
Secondary Insurance Group # |
| Anesthesiologist(s) | PatientIDVisit | Secondary Insurance Payer |
| ASA Score | Performed Procedure | Secondary Insurance Policy # |
| Assisting Physician | Physician(s) |
Secondary Sub EMP/Phone |
| BMI | Primary Insurance Authorization # |
Service Date (date only) |
|
City |
Primary Insurance Group # | Sex at Birth |
| Diagnosis |
Primary Insurance Payer |
Specimen(s) |
|
DOB |
Primary Insurance Policy # |
SSN |
|
DOS (date & time) |
Primary Physician | State |
| Driver's License | Primary Procedure(s) | Zip Code |
Note: For the Non-Primary Physician rhetorical to function, the non-primary physician must have an active eChart log in.
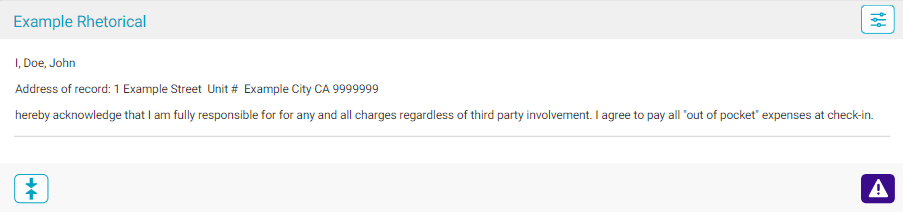
Example of a rhetorical statement in the Question/Statement Library and in a patient chart:
Question Configurations
There are multiple configuration settings that can be applied to a question or statement. These configurations affect how the questions behave or display in a patient's chart. The configurations can be viewed by tapping the Configure tab in the Add or Edit Question/Statement form.
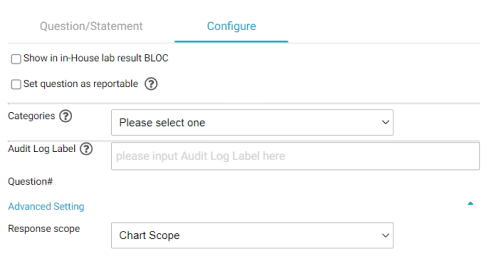
- Show in in-House lab result BLOC: When this checkbox is selected, if the question is answered in a chart, then the question and its response will appear in the In-House Lab Results BLOC as well as the In-House Lab Results area of the Current Visit Summary.
- Set Question as reportable: When this checkbox is selected, then the question can be used in HST Insight. (Note: this may have additional future functionality ramifications.)
- Categories: Categories can be added to a question/statement in order to make it easier to find. To add a category, select it from the drop-down. The category will then appear beneath the drop-down. To remove a category from a question, tap the "x" for the category.

- Audit Log Label: The Audit Log Label is what will appear for the question in the audit log. If this field is empty, then the full question/statement text will appear in the audit log.
- Question#: This is a read only field. The Question# is a unique ID number. For new questions/statements, the ID# is automatically assigned when the question/statement is saved.
Advanced Setting: Tapping Advanced Setting expands the section, allowing the user view and change the setting.
- Response scope: This setting controls whether the response to the question is shared across every place the question appears in a patient's chart. The drop-down has two options: Chart Scope or BLOC Scope. Chart Scope is always selected by default.
- If Chart Scope is selected for a question, when the question is answered in one area of a chart then that answer will be applied to every instance of the question within the chart. Example: The question "Is the patient diabetic?" is marked as Chart Scope. The question appears in Questions BLOCs in the Pre-Op and PACU workflows. When a nurse answers the question in the Pre-Op workflow then that answer is also applied to the question in the PACU workflow. If the PACU nurse changes the answer in the PACU workflow, then the answer in the Pre-Op workflow changes to match.
- If BLOC Scope is selected for a question, when the question is answered in one area of a chart it will not affect or answer the question in any other areas of the chart. BLOC scoped questions should not be used in a Questionnaire that will be used as a consent. Example: The question "Escort is present at bedside?" is marked as BLOC Scope. The question appears in Questions BLOCs in the Pre-Op and PACU workflows. When a nurse answers the question in the Pre-Op workflow, nothing happens to the question in the PACU workflow - it remains unanswered. When the question is answered in the PACU workflow, it will not change or affect the answer that was selected in the Pre-Op workflow.
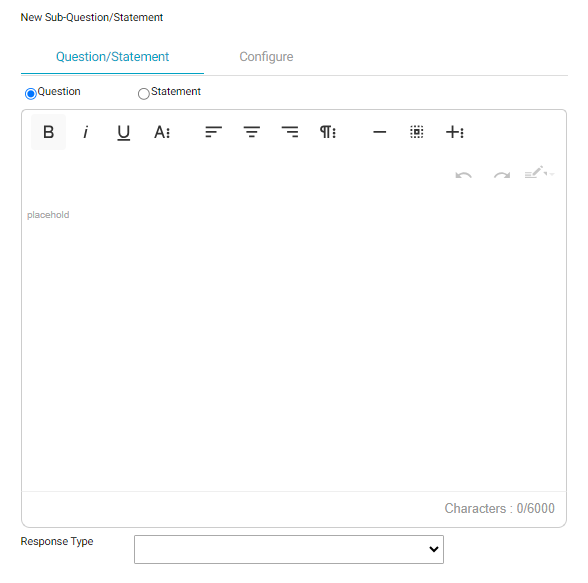
Create a New Question or Statement
Questions and statements can be created from the Question/Statement library as well as from the Questionnaire library. This section covers creating a question in the Question/Statement Library. To learn how to create a question from the Questionnaire Library, jump to the Questionnaire section.
To create a question/statement that does not use the rhetorical response type:
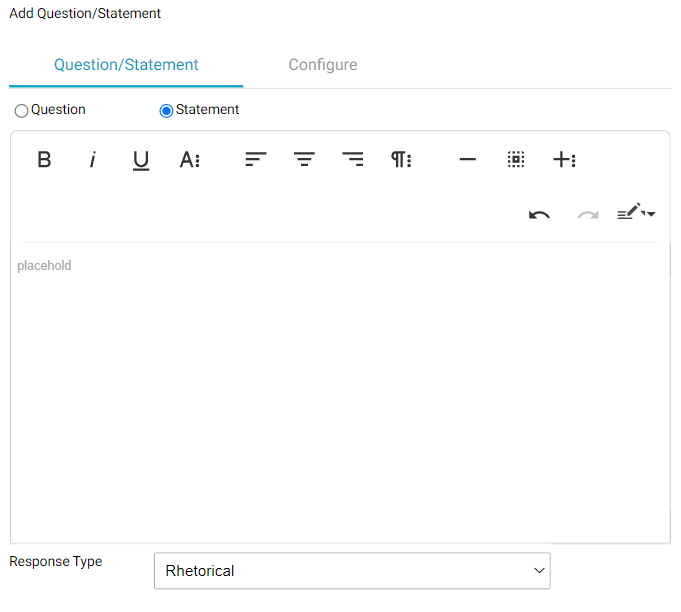
- To create a new question from the Question/Statement Library, click the + button at the top of the grid. The Add Question/Statement form will appear on the right side of the screen.
- Enter the question text in main text field.
- Select the desired response type from the Response Type drop-down.
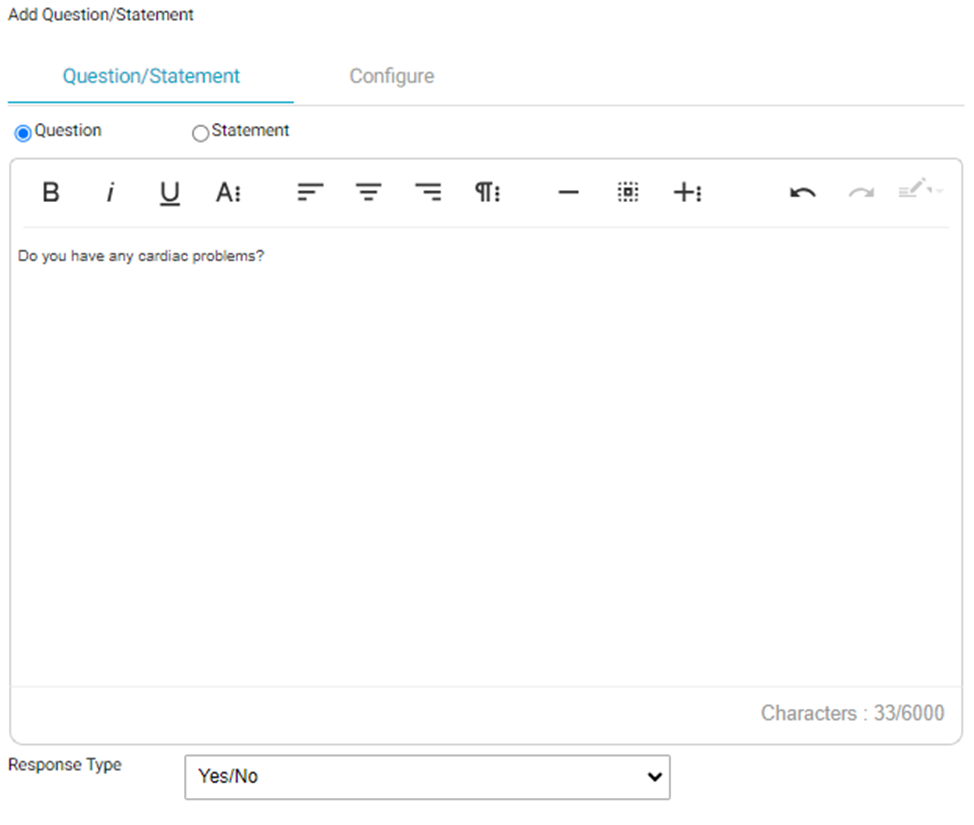
- If needed, tap the Configure tab to adjust the question configurations. See Question Configurations for an explanation of the function of each configuration setting.
- When done, tap the Save button.
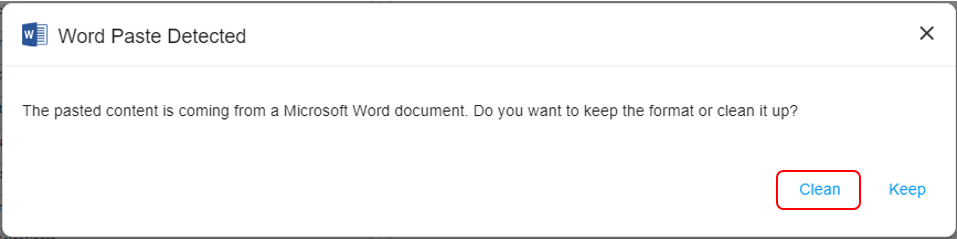
Note: there is a character counter in the bottom right corner of the question text field. The limit for an individual question is set to be 6000 characters, however questions that have a large amount of formatting associated (bold, large fonts, line breaks, or additional hidden characters added if the user copies and pastes from a document into the question text. It is recommended to use the “Clean” option when pasting text into the question text from another document. Formatting can be added within HST eChart.
To create a question/statement that uses the Rhetorical response type:
- To create a new question from the Question/Statement Library, click the + button at the top of the grid. The Add Question/Statement form will appear on the right side of the screen.
- Select either the Question or the Statement radio button.
- Select Rhetorical from the Response Type drop-down.
- In the main text field, enter the desired text. Wherever a rhetorical placeholder is to be inserted, place the cursor in that location and then tap the Rhetorical button in the text editor tool bar. From the Rhetorical button drop-down, tap the desired placeholder. Repeat this step until all text and rhetorical place holders are in place.

- If needed, tap the Configure tab to adjust the question configurations. See Question Configurations for an explanation of the function of each configuration setting.
- When done, tap the Save button.
Sub-Questions
A sub-question is an additional question or statementional question or statement that appears if a particular response is selected for the main question. Sub-questions can only be added to questions whose response type is Yes/No, Yes/NA, Yes/No/NA, Yes/No/Unknown, Positive/Negative, Right/Left/Bilateral, Checkbox, Filler, or Rhetorical.
A single question can have different sub-questions for each response option. For example, the question "Will your escort be waiting in the parking lot today?" has the response type Yes/No. The Yes response could have the sub-question, "What make and color car will they be waiting in?" The No response could have the sub-question "What number should we call to tell them to return?"
A single question may have up to three levels of sub-questions.
This section covers:
- How to add a sub-question to a question which does not have any existing sub-questions
- How to add a sub-question to a question which has existing sub-question(s)
- How to add a sub-question to an existing sub-question
- How to edit a sub-question
To learn how to add or edit sub-questions from the Questionnaire Library, go to Questionnaire Section.
NOTE: you cannot create or edit questions and sub-questions in the same action. If you need to edit both the question and the sub-question, edit one first and save then return and edit the other and save.
To add a sub-question to a question which does not have any existing sub-questions:
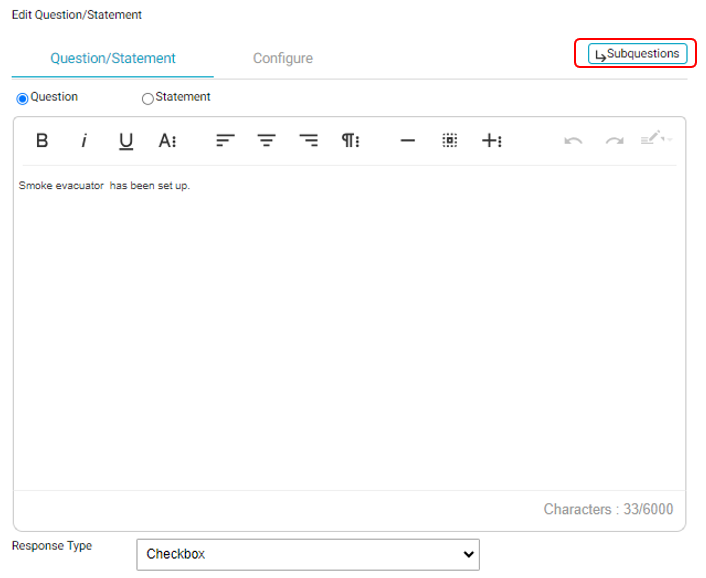
- In the Question Library, locate the question to which the sub-question should be added and tap the edit pencil for that question. Keep in mind that only certain response types support the addition of sub-questions.
- Tap the Subquestions button, which is to the right of the Question/Statement and Configure tabs. The Edit Subquestions overlay will appear.
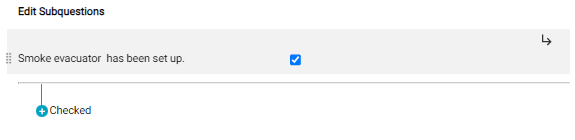
- Select the response which will make the sub-question appear. Keeping your cursor over the question row, see that two buttons appear on the right hand side.
- Click the sub-question button.
- The New Sub-Question/Statement overlay will appear. Enter the question/statement text in the text editor field and select the Response Type from the drop-down.
- If needed, tap the Configure tab to adjust the question configurations. See Question Configurations for an explanation of the function of each configuration setting.
- When done, tap the Save button followed by the Close button to close the sub-question editing, and the question level Edit Complete button.
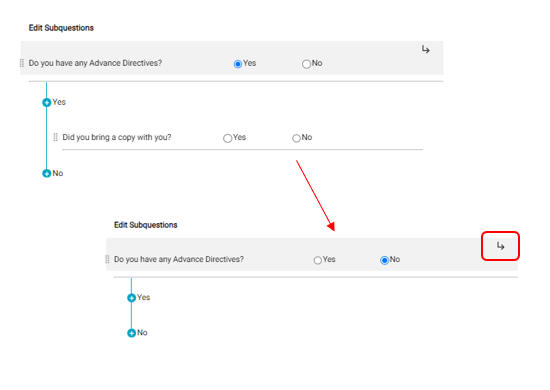
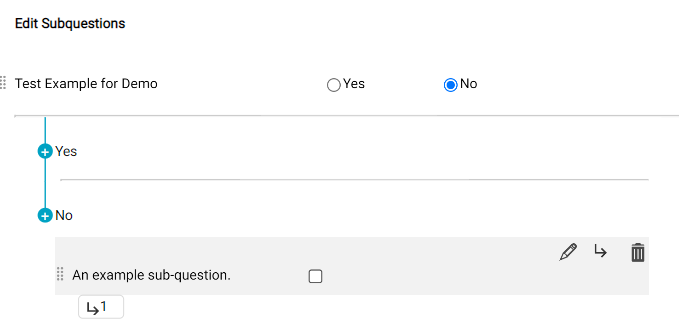
To add a sub-question to a question which has existing sub-question(s):
- In the Question Library, locate the question to which the sub-question should be added and tap the edit pencil for that question. The Edit Subquestions layover will appear.
- Select the response which will make the sub-question appear. Keeping your cursor over the question row, see that two buttons appear on the right hand-side.
- Click the sub-question button.
- The New Sub-Question/Statement overlay will appear. Enter the question/statement text in the text editor field and select the Response Type from the drop-down.
- If needed, tap the Configure tab to adjust the question configurations. See Question Configurations for an explanation of the function of each configuration setting.
- When done, tap the Save button.
- Repeat the above steps to add additional sub-questions, or click the Close button to close the sub-question editing, and the question level Edit Complete button.
To add a sub-question to an existing sub-question:
Keep in mind that only certain response types support the addition of sub-questions.
- In the Question Library, locate the question to which the sub-question should be added and tap the edit pencil for that question. The Edit Subquestions layover will appear.
- For the parent question, select the response associated with the sub-question to which the new question should be added. The sub-question will display.
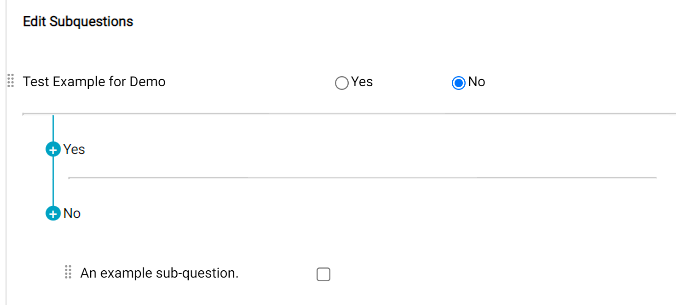
- Select the response to the sub-question. Keeping the cursor over the question row, see that three buttons appear on the right hand side.
- Click the sub-question button.
- The New Sub-Question/Statement overlay will appear. Enter the question/statement text in the text editor field and select the Response Type from the drop-down.
- If needed, tap the Configure tab to adjust the question configurations. See Question Configurations for an explanation of the function of each configuration setting.
- When done, tap the Save button.
- Repeat the above steps to add additional sub-questions, or click the Close button to close the sub-question editing, and the question level Edit Complete button.
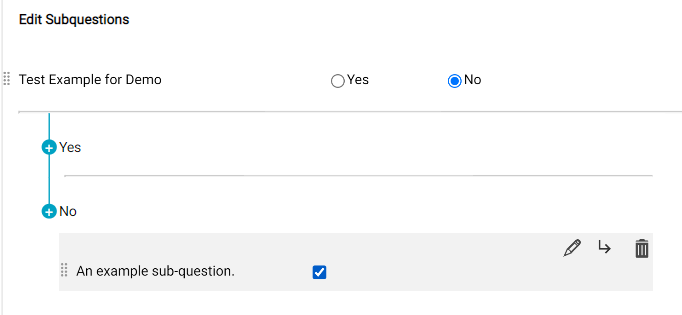
- In the Question Library, locate the question to which has sub-question to be edited. The Edit Subquestions layover will appear.
- For the parent question, select the response associated with the sub-question that is to be edited. The sub-question will display.
- Hover the cursor over the sub-question that is to be edited. See that the edit button appears on the right-hand side of the row.
- Click the pencil.
- The Edit Sub-Question/Statement overlay will appear. Edit the sub-question as needed.
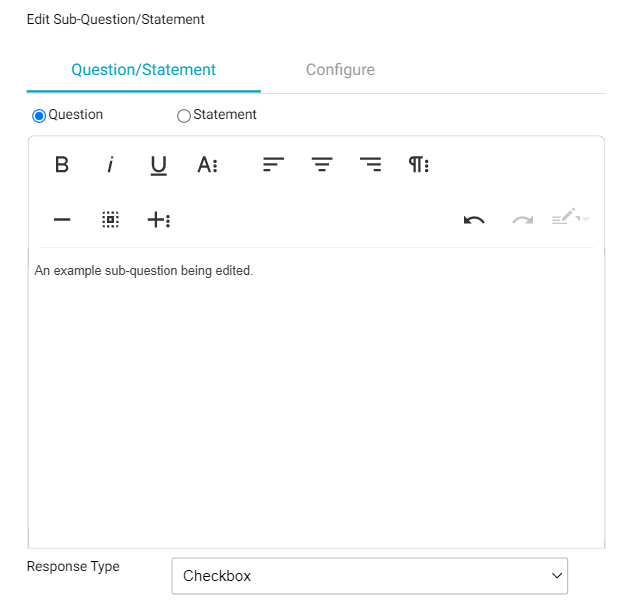
- When done, tap the Save button followed by the Close button to close the sub-question editing, and the question level Edit Complete button.
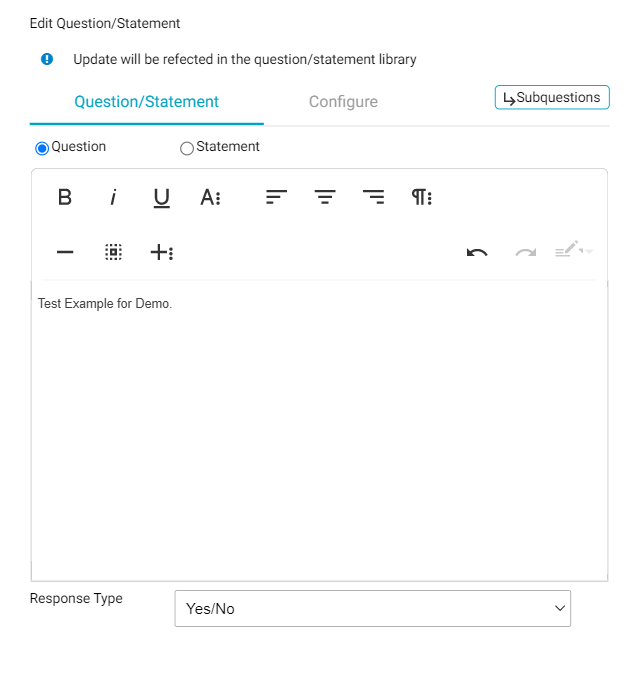
Edit a Question or Statement
Questions and statements can be edited from the Question/Statement library as well as from the Questionnaire library. This section covers editing a question in the Question/Statement Library. To learn how to edit a question from the Questionnaire Library, jump to the Questionnaire section.
- Locate the question/statement to be edited and tap the edit pencil. The Edit Question/Statement layover will appear.
- Make edits as desired. The question/statement text, response type, and configurations may be changed. For instructions on editing a sub-question, jump to editing an existing sub-question.
- NOTE: you cannot create or edit questions and sub-questions in the same action. If you need to edit both the question and the sub-question, edit one first and save then return and edit the other and save.
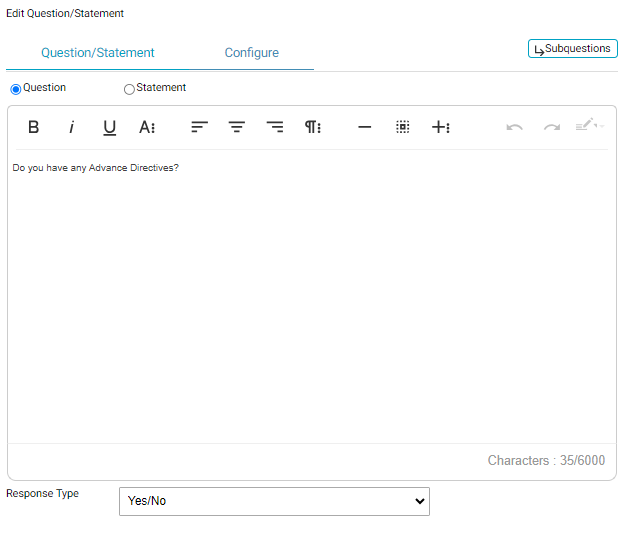
- When done, tap the Save button.
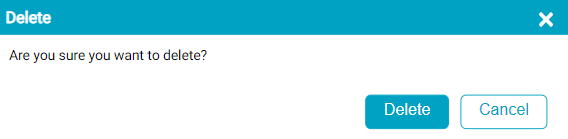
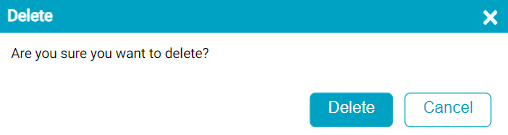
Delete a Question or Statement
Questions and statements can be removed from the Question/Statement library as long as the question/statement is not currently used in a questionnaire.
- In the Question/Statement Library, locate the question/statement to be deleted.
- Select the checkbox for the question and then tap the delete button at the top of the grid.
- If the question/statement is not in a questionnaire, a confirmation flyout will appear. Tap the Delete button to delete the question/statement from the library.
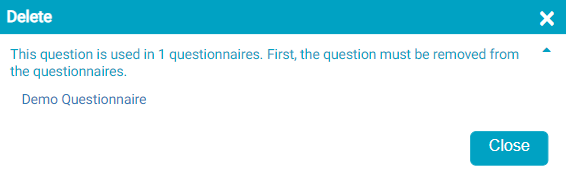
- If the question/statement is in use in one or more questionnaires, a flyout will appear informing the user that the question/statement cannot be deleted until it is removed for all questionnaires. The flyout lists the questionnaire(s) which contain the question/statement. Tap the Close button to close the flyout. The user will need to navigate to the Questionnaire Library and remove the question/statement from the listed questionnaires. The user may then return to the Question/Statement library and delete the question.
Questionnaire Library
The Questionnaire Library tab contains a grid that lists all available questionnaires. By default, only active questionnaires will display, but the user can view all questionnaires by deselecting the Hide Inactive checkbox which is located to the right of the search field.
From the Questionnaire Library tab, users can add, edit, or delete a questionnaire.
At the top of the tab there is a free text search field. The search function searches Questionnaire names.
The Questionnaire Library grid contains columns for Questionnaire, Consent, Inactive, Create Date, and Created By. If the center is using the HST eChart/HST Patient Engagement Integration, an additional column for Patient Engagement will appear.
- The Questionnaire column displays the name of the questionnaire.
- The Consent column will have a check mark if the questionnaire is marked as use for consent.
- If it is present, the Patient Engagement column will have a check mark if the questionnaire was imported from HST Patient Engagement.
- The Inactive column will have a check mark if the questionnaire is no longer active. Previous versions of questionnaires (after an edit is made) are considered inactive as well as questionnaires that have been deleted.
- The Create Date columns displays the date the questionnaire was created or last edited.
- The Created By column displays the username of the user who created or last edited the questionnaire.

Create a New Questionnaire
- On the Questionnaire Library tab, click the + button at the top of the grid. The New Questionnaire form will appear on the right side of the screen.
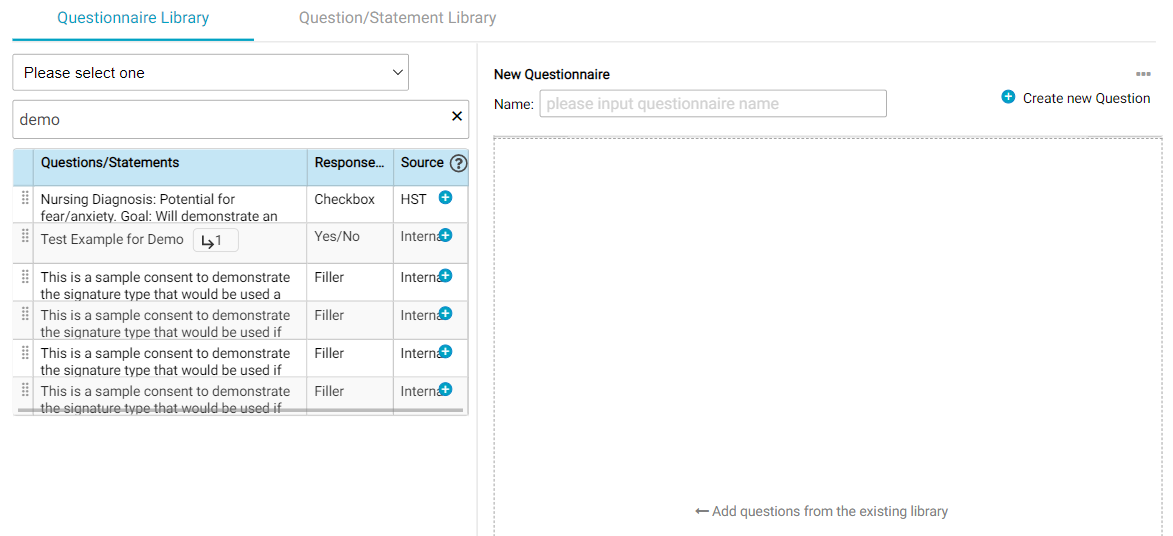
- Enter a name for the Questionnaire in the Name field.
- If the questionnaire will be used in a Consent BLOC, select the Consent radio button next to Use for. Important: Questionnaires that will be used in a consent should NOT contain any BLOC scoped questions.
- If the questionnaire has been imported from HST Patient Engagement, the Patient Engagement radio button will be automatically selected and these radio buttons will be inactive and cannot be changed.

- To add an existing question/statement to the questionnaire, locate it in the question library pane on the left had side of the window. Questions/statements can be located by using categories or by searching. Clicking the
 button for the question/statement, will add it to the bottom of the questionnaire. The user may also click the drag and drop icon,
  , and drop the question to the desired location within the questionnaire.
 - A new question may also be created and added to the questionnaire. Jump to Create a new question/statement from the Questionnaire Library for instructions on that process.
- To make a question required in the questionnaire, hover over the question to reveal the required-ness icon,
 , and then click the icon. The reverse of this process applies to change a question from required to not required. Note: If the question is present in multiple questionnaires, changing the "required-ness" in one questionnaire will not affect the "required-ness" in the other questionnaires
 - To edit a question from the questionnaire library, hover over the question and click the pencil. Make desired edits and click on Save to complete the question edits and Save again to complete the questionnaire edit.
- NOTE: edits made to questions from within the questionnaire will be reflected in the Question Library and any other questionnaires containing the same question.
- To delete a question from the questionnaire, hover over the question to reveal the delete icon. Tap the icon to remove the question.
- Once all necessary questions/statements have been added to the questionnaire, click the Save button. Note that the maximum number of Questions allowed in a Questionnaire is 256, including sub-questions.
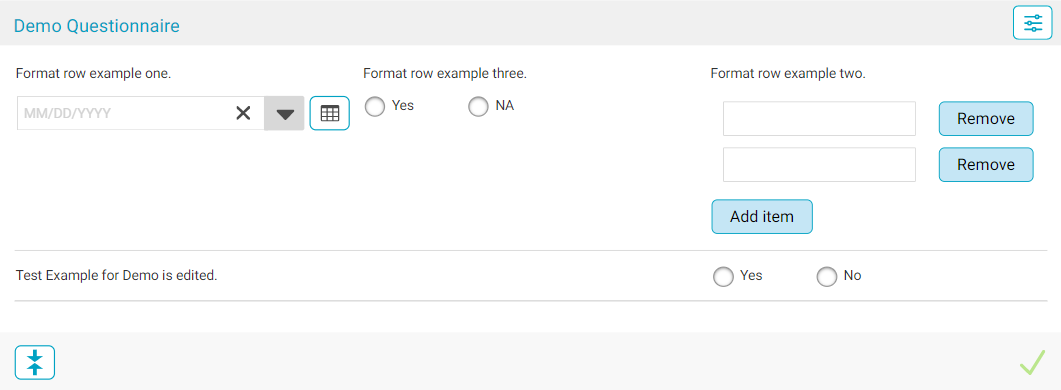
Format Rows in a Questionnaire
Questionnaires can be formatted so that more than one question is present in a row. This row formatting is reflected in both the Questionnaire Library and when the questionnaire is used in a patient chart. Due to layout constraints within the chart, only questions without sub-questions can be added to formatted rows.
To format a row in a questionnaire when creating or editing a questionnaire:
- To add a row, in the questionnaire determine which question should appear first on the row. Tap the three ellipses,
 , on the far-right side of the question. A menu will display.
 To remove a row, tap the three ellipses,
, on the far-right side of any question in the row. A menu will display. - On the menu, tap Format Row. A sub-menu will display listing the options for the number of questions per row - one, two, or four.
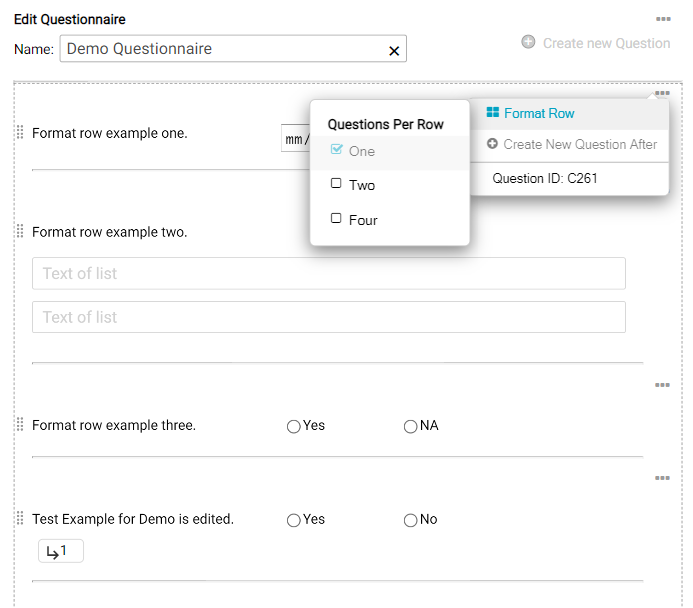
- Select the desired checkbox. For questions which are in a row, selecting one remove the row formatting. After selection, the menu will close and the row will be created in the questionnaire. When creating a row, the question used add the row will appear first in the row and there will either be one or three empty spaces in the row depending on what option was selected for Questions Per Row.
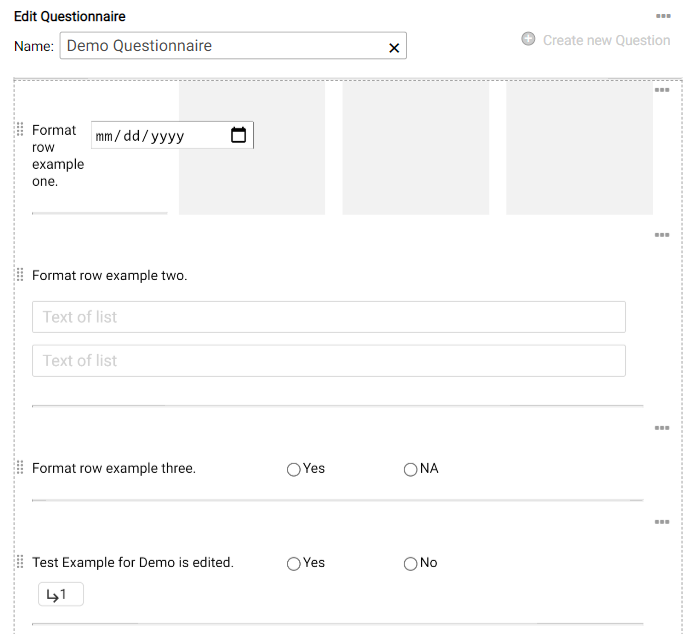
- To add a question to the row, drag and drop it into one of the empty spaces in the row. When released, the question will be added to the next empty space.
- To remove a question from the row, drag and drop it to the desired location in the questionnaire. Any questions which were present in the row to the right of the removed question will shift left to fill in the empty space.
- Questions cannot be reordered using drag and drop once in a row. Instead, the question(s) must be removed from the row using drag and drop and the added again to the row in the desired order.
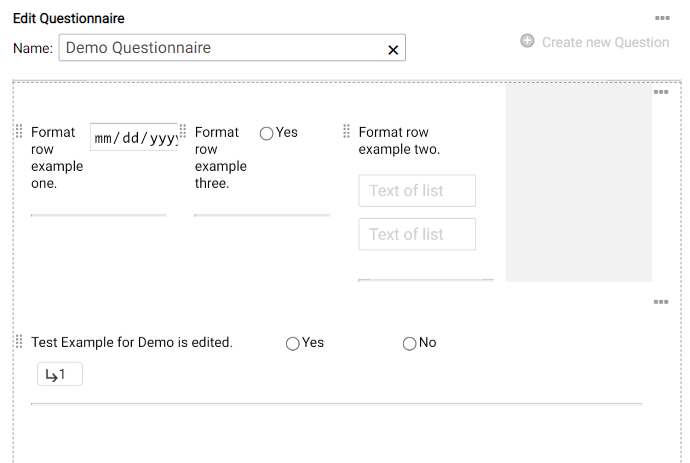
- Once formatting is complete, tap the Save button. Note that not all spaces in a row are required to be filled. If there are empty spaces in a row, the formatting in the chart will adjust so that the questions in the row are equally spaced.
Edit a Questionnaire
Users are able to edit existing questionnaires, but edits made to a questionnaire will not be reflected in questionnaires which are already in an existing patient chart. However, the edited questionnaire can be brought into a chart. First remove the Questions BLOC that contains the old version of the questionnaire. Then use “Add After” to bring in the new questionnaire or consent. Do not use “Restore BLOC” as this will bring back in the old, incorrect BLOC.
Note: If a questionnaire is used in a Chart Template and that questionnaire is updated, then the Chart Template must be republished for updates to appear in new charts.
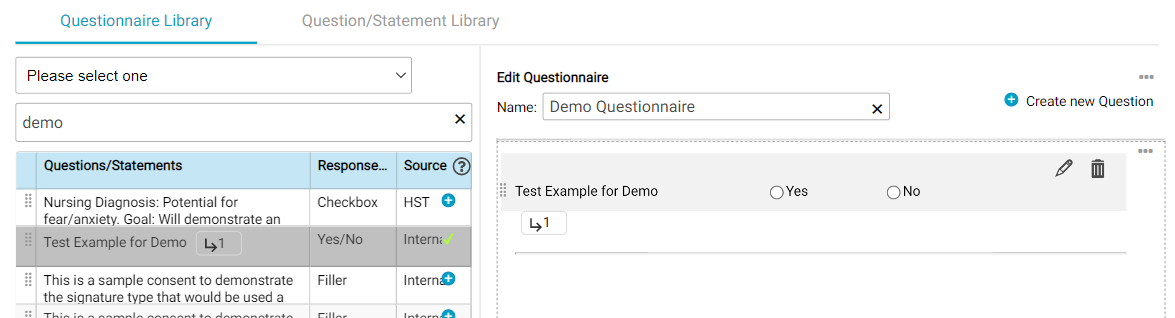
- In the Questionnaire Library tab, locate the questionnaire to be edited and then click the Edit button. The Edit Questionnaire form will appear on the right side of the screen.

- Make the desired edits. The questionnaire name, the questions/statements that make up the questionnaire, and whether the questionnaire will be used in a consent may all be edited.
- To add an existing question/statement to the questionnaire, locate it in the question library pane on the left had side of the window. Questions/statements can be located by using categories or by searching. Clicking the button for the question/statement, will add it to the bottom of the questionnaire. The user may also click the drag and drop icon, , and drop the question to the desired location within the questionnaire.
- To delete a question from the questionnaire, hover over the question to reveal the delete icon. Tap the icon to remove the question.
- To make a question required in the questionnaire, hover over the question to reveal the edit icon and then click the icon. Select the checkbox for "Require an answer" and then tap Save. The reverse of this process applies to change a question from required to not required. Once the questionnaire is saved, any required questions will have an * after them. Note: If the question is present in multiple questionnaires, changing the "required-ness" in one questionnaire will not affect the "required-ness" in the other questionnaires.
- To add an existing question/statement to the questionnaire, locate it in the question library pane on the left had side of the window. Questions/statements can be located by using categories or by searching. Clicking the
- Once desired edits are complete, click the Save button.
- If the questionnaire is in use in any Chart Templates, republish the Chart Templates for the edits to be applied to the template.
- NOTE: questionnaires that have been added on installation by HST or imported from HST Patient Engagement cannot be edited and will display an
 icon instead of a pencil. These questionnaires also cannot be deleted. Questionnaires imported from HST Patient Engagement also cannot be cloned.
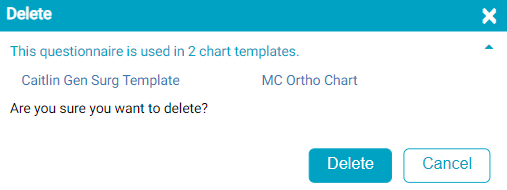
Delete a Questionnaire
Users may delete a questionnaire from the Questionnaire Library, if they have created it. When a questionnaire is deleted, it is no longer considered active - it cannot be added to a chart template or added to a chart on the fly. If a questionnaire is in chart template(s) prior to deletion, then the questionnaire will continue to function in charts which already contain those questionnaires. However, the chart template(s) that contain the deleted questionnaire cannot be republished unless the deleted questionnaire is removed from the template or replaced with an active questionnaire.
- In the Questionnaire Library, locate the questionnaire to be deleted.
- Select the checkbox for the questionnaire and then tap the delete button at the top of the grid.

- If the questionnaire is not being used in any chart templates the following flyout will appear. Tap the Delete button to delete the questionnaire.
- If the questionnaire is currently being used in any chart templates, the following message will appear. Tap the Delete button to delete the questionnaire. Keep in mind that the questionnaire will be deleted from the library, but it will still be present in the chart template(s) and any charts created using those template(s) until the template is edited.
Editing the Question/Statement Library from the Questionnaire Library
Actions that are performed in the Question/Statement Library, such as adding and editing questions/statements, can also be performed from within the Questionnaire Library. This allows the user to more efficiently create and edit questionnaires. The only function from the Question/Statement Library which cannot be performed from the Questionnaire Library is deleting a question/statement from the Question/Statement library.
Create a New Question/Statement from the Questionnaire Library
New questions can be added to the Question/Statement Library when creating or editing a questionnaire.
-
To create a new question/statement from the New or Edit Questionnaire forms, the question library (on the left side of the screen) must first be searched to ensure a suitable question does not already exist. Entering text in the search field will enable the Create new Question button which is located to the right of the questionnaire Name field. Tapping this button will result in the New Question/Statement layover to appear.
- Enter the question/statement text, select a Response Type, make Configuration selections as needed, and then click the Save button. The new question will be added to both the questionnaire and the Question/Statement Library.
Edit a Question/Statement from the Questionnaire Library
Existing questions can be edited when creating or editing a questionnaire. Any edits made will be applied to the Question Library and all questionnaires which contain the question.
- Add the question/statement to be edited to the questionnaire.
- Hover over the question to be edited to reveal the edit icon.
- Tap the edit icon. The Edit Question/Statement layover will appear.
- Make the desired edits using the same steps as when editing a question/statement from the Question/Statement Library.
- Once the desired edits are complete, click Save.
Edit a Sub-Question from the Questionnaire Library:
Sub-questions can be edited or added when creating or editing a questionnaire. Any edits made will be applied to the Question Library and all questionnaires which contain the question.
- Add the question/statement which contains the sub-question to be edited to the questionnaire.
- Hover over the question to be edited to reveal the edit icon.
- Tap the edit icon. The Edit Question/Statement layover will appear.
- Tap the Subquestions button.
- From the Edit Subquestions overlay, the user can edit, add, or delete sub-questions using the same process outline in the Sub-Questions section.
Troubleshooting
Questionnaire Template won't save?
- Check how many questions are in the Questionnaire. No more than 256 questions, which includes sub-questions, may be in a Questionnaire.
Edits to Questionnaires aren't displaying in charts?
- Check that the chart templates that contain the questionnaire or consent were published again after the changes were made. Changes to questionnaires/consents that are in a chart template won’t display in new charts until the Chart Template is published. The Last Published Date for each chart template is in the far-right column of the Chart Templates page in Admin Home. The create date for the chart is located at the bottom of the Chart Home tab.
- Check that the chart was opened after the chart template was republished. The create date for each chart is located on the Chart Home page.
The Questionnaire that is to be used in a Consent isn't displaying in the Questionnaire Template drop-down.
- Go to the Questionnaire library and confirm that the "Use for Consent” radio button is selected. If the radio button is not selected, then the Questionnaire will not appear on the drop-down.